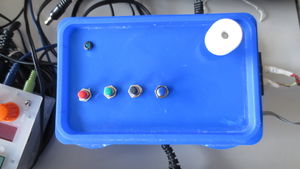
Loop-Vinyl
| Loop-Vinyl |
|---|
Pour modifier la page utiliser l'onglet Modifier avec formulaire.
| Résumé | Faire tourner une platine vinyle en boucle |
|---|---|
| Auteur(s) | guillaume |
| Licence | CC-BY-SA 3 |
| Date de création | 08 août 2014 |
Sommaire
Intentions / Contexte
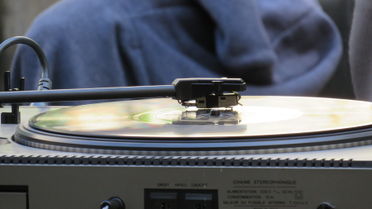
Ce dispositif permet de faire des "boucles" avec une platine disque, ou plutôt lire un disque d'avant en arrière dans une boucle temporelle.
Principe de fonctionnement
Contrôler en direct un genre de bouclage vinylesque...
Besoins / Compétences
Il faut se munir d'un driver moteur, d'un arduino, de quatre switch (Play, Stop, Reverse, Loop) et d'un potentiomètre qui permet de régler la vitesse de lecture.
Documentation
Quelle platine?
Entraînement par courroie
Pour le moment c'est une platine à courroie qui permet d'entraîner le plateau. L'inertie de ce mode d'entraînement permet de faire des boucles avec une vitesse non constante au début et à la fin du cycle.
Entraînement direct
Pas encore tester mais dans le principe la vitesse devrait être constante en début et fin de boucle.
Un peu d'électronique
Matériel
- 4 switch momentanés
- 4 résitances de 10k
- 1 potentiomètre linéaire de 100k
- 1 led
- du fil
Connexion de la platine
Il suffit de souder deux fils aux bornes du moteur pour les relier au driver moteur
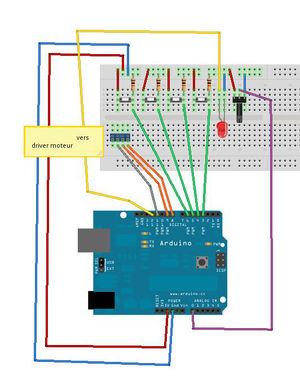
Schéma de cablage
Ce schéma ne fait pas apparaître l'alimentation du moteur
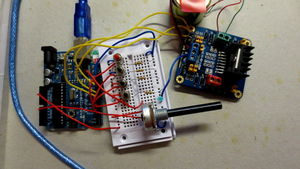
- Sur une platine d'essai :
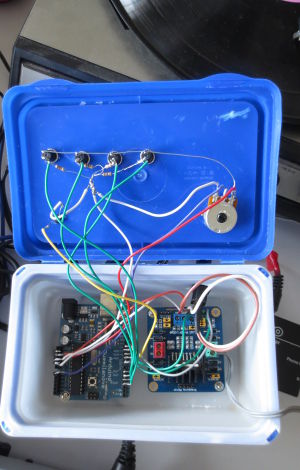
- Dans une boite :
Driver moteur
Pour ce test j'ai utilisé un circuit basé sur un pont en H du type L298N, il permet de contrôler le sens de rotation ainsi que la vitesse d'un moteur CC ou d'un pas à pas.
Un peu de code
Voià le code arduino basé sur StopWatch de Paul Badger. Merci à Olivier et Ludo pour leur aide précieuse...
/* StopWatch
* Paul Badger 2008
* Demonstrates using millis(), pullup resistors,
* making two things happen at once, printing fractions
*
* Physical setup: momentary switch connected to pin 4, other side connected to ground
* LED with series resistor between pin 13 and ground

LOOP VINYL
Commande vitesse PWM
potentiomètre en A0 -> Analog input

Commande moteur -> 3 pin EA, I1, I2
EA -> vitesse - valeur potentiomètre pwmOUT pin11
I1 -> direction - digitalOUT8
I2 -> direction - digitalOUT9

Changement de sens selon temporisation
bouton loop -> digitalIn3

bouton Play -> digitalIn 6
bouton Stop -> digitalIn 5
bouton Rew -> digitalIn 4


*/


int pinPot = 0 ;                //potentiomètre réglage vitesse

#define ledPin  12                 // LED connected to digital pin 13
#define buttonPin 3                 // button loop

int value = LOW;                    // previous value of the LED
int buttonState;                    // variable to store button state
int lastButtonState;                // variable to store last button state
int blinking;                       // condition for blinking - timer is timing
long interval = 100;                // blink interval - change to suit
long previousMillis = 0;            // variable to store last time LED was updated
long startTime, startTimeLoop;                    // start time for stop watch
long elapsedTime ;                  // elapsed time for stop watch
int fractional;                     // variable used to store fractional part of time
boolean avant;

void setup()
{
  Serial.begin(9600);
  pinMode( 3, INPUT);  //loop
  pinMode( 4, INPUT);  //play
  pinMode( 5 , INPUT);  //stop
  pinMode( 6 , INPUT);  //reverse
  pinMode( 8 , OUTPUT); //commande moteur I1 (sens rotation)
  pinMode( 9 , OUTPUT); //commande moteur I2 (sens rotation)
  pinMode( 11 , OUTPUT); //commande moteur vitesse (pwm)

  //pinMode(buttonPin, INPUT);       // not really necessary, pins default to INPUT anyway
  digitalWrite(3, HIGH);   // turn on pullup resistors. Wire button so that press shorts pin to ground.

  avant = true;

}

void loop()
{

  //Serial.print(".");
  loopage(); //programme de comptage de temps entre 2 impulsions
  play();
  stopage();
  reverse();

  pinPot = analogRead(0) ; //lecture valeur potentiomètre Vitesse
  analogWrite(11 , analogRead(0)); //valeur vitesse pwm
  //Serial.print("pot");
  //Serial.println(pinPot, DEC);
  if  (elapsedTime != 0) {
    lectureLoopage();

  }

}

void play()
{
  if (digitalRead(6) == HIGH)
  {
    digitalWrite( 8 , HIGH );
    digitalWrite( 9 , LOW );
    elapsedTime = 0;
  }

}

void stopage()
{
  if (digitalRead(5) == HIGH)
  {
    digitalWrite( 8 , LOW );
    digitalWrite( 9 , LOW );
    elapsedTime = 0;
  }
}

void reverse()
{
  if (digitalRead(4) == HIGH)
  {
    digitalWrite( 8 , LOW );
    digitalWrite( 9 , HIGH );
    elapsedTime = 0;
  }
}


void loopage()
{
  // check for button press
  buttonState = digitalRead(3);                   // read the button state and store


  if (buttonState == LOW && lastButtonState == HIGH  &&  blinking == false){     // check for a high to low transition
    // if true then found a new button press while clock is not running - start the clock

    startTime = millis();                                   // store the start time
    blinking = true;                                     // turn on blinking while timing
    delay(5);                                               // short delay to debounce switch
    lastButtonState = buttonState;                          // store buttonState in lastButtonState, to compare next time

  }

  else if (buttonState == LOW && lastButtonState == HIGH && blinking == true){     // check for a high to low transition
    // if true then found a new button press while clock is running - stop the clock and report

    elapsedTime =   millis() - startTime;              // store elapsed time
    blinking = false;                                  // turn off blinking, all done timing
    lastButtonState = buttonState;
    startTimeLoop = millis();
    avant = true;
    digitalWrite( 8 , HIGH );
    digitalWrite( 9 , LOW );

    // store buttonState in lastButtonState, to compare next time

    // routine to report elapsed time
    Serial.print( (int)(elapsedTime / 1000L));         // divide by 1000 to convert to seconds - then cast to an int to print


    //Serial.print(".");                             // print decimal point

      // use modulo operator to get fractional part of time
    fractional = (int)(elapsedTime % 1000L);

    // pad in leading zeros - wouldn't it be nice if
    // Arduino language had a flag for this? :)
    if (fractional == 0)
      Serial.print("000");      // add three zero's
    else if (fractional < 10)    // if fractional < 10 the 0 is ignored giving a wrong time, so add the zeros
      Serial.print("00");       // add two zeros
    else if (fractional < 100)
      Serial.print("0");        // add one zero

    Serial.println(fractional);  // print fractional part of time

  }

  else{
    lastButtonState = buttonState;                         // store buttonState in lastButtonState, to compare next time
  }

  // blink routine - blink the LED while timing
  // check to see if it's time to blink the LED; that is, the difference
  // between the current time and last time we blinked the LED is larger than
  // the interval at which we want to blink the LED.

  if ( (millis() - previousMillis > interval) ) {

    if (blinking == true){
      previousMillis = millis();                         // remember the last time we blinked the LED

      // if the LED is off turn it on and vice-versa.
      if (value == LOW)
        value = HIGH;
      else
        value = LOW;
      digitalWrite(ledPin, value);
    }
    else{
      digitalWrite(ledPin, LOW);                         // turn off LED when not blinking
    }
  }

}

void lectureLoopage() {

  if (elapsedTime <= millis() - startTimeLoop) {

    startTimeLoop = millis();
    avant = !avant;


    if (!avant) {
      //reverse
      digitalWrite( 8 , LOW );
      digitalWrite( 9 , HIGH );
    }

    if (avant) {
      //play
      digitalWrite( 8 , HIGH );
      digitalWrite( 9 , LOW );
    }


  }
}
