Solenoïdes Midi
Sommaire
Description du projet
Piloter 4 solénoïdes avec une interface midi ( Piano, logiciel, Matériel : Electribe ) : on a un Sequenceur qui envoie des note_On Note-Off sur 4 notes différents ( canal midi identique ), déclenchant 4 solénoides différents.
* Exemples et démo : http://antoine-bellanger.blogspot.com/p/solenoides.html
Matériel utilisé
- Ordinateur avec Arduino installé
- Solénoides
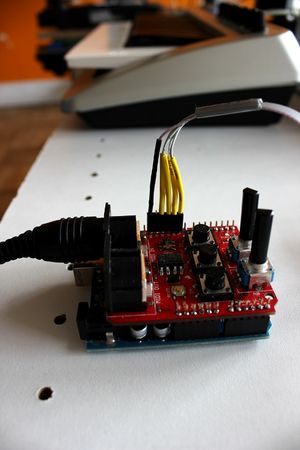
- Carte Arduino
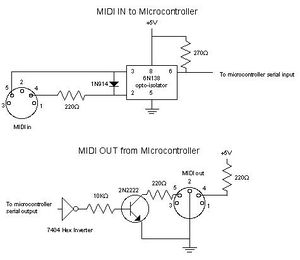
- Shield MIDI arduino http://www.robotshop.com/sfe-midi-arduino-shield-1.html
- Câble USB
- Câbles elec
- Câbles Midi
- Platine d'essai
- Alimentation PC
Considérations
Problématique de la puissance.
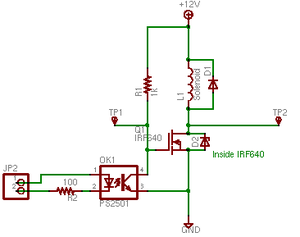
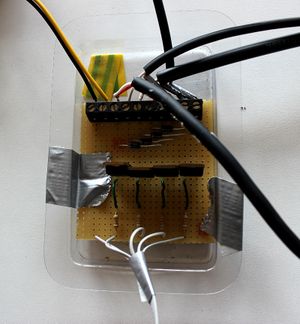
Des petites puissances sont facile à commander par des transistors (par ex :les MOSFET IRF640) Un transistor est un interrupteur électronique. Ils laissent passer ou non la tension pour les solénoïdes qui utilisent l'alimentation d'ordinateur pour fonctionner.
Les transistors IRF640 ont des caractéristiques propres à leur fabrication et ne peuvent pas laisser passer une intensité supérieur à 18 Ampères Cf la datasheet : http://www.datasheetcatalog.com/datasheets_pdf/I/R/F/6/IRF640.shtml
Du coup, une alimentation d'ordi de 500 W fonctionnant en 12 V pourrait fournir au maximum : P = U * I donc I = P / U I alim = 500 / 12 = 41 Ampères (environ)
Ce qui est largement suffisant pour des petits solénoïdes comme par exemple : http://www.gotronic.fr/art-solenoide-miniature-ea012-11621.htm
Qui consomme : 92 mA soit 0.092 Ampère
Mais on ne pourrait pas alimenter un gros solénoïde qui consomme beaucoup de courant comme par exemple un solénoïde de démarreur de voiture.
On pourrait utiliser une batterie de voiture (qui peut fournir + de 100 A en 12 Volt) à la place de l'alimentation d'ordi pour alimenter de gros solénoïdes.
Si l'intensité demandé par les solénoïdes dépasse 18 A (la limite des IRF640) on passera alors à des relais à la place des IRF640, comme interrupteurs.
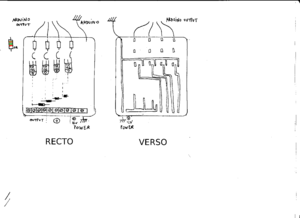
Montage électronique
| Qtt | Nom | Valeur | Référence Fabricant | Fabricant | Référence Fournisseur | Fournisseur |
|---|---|---|---|---|---|---|
| 1 |
Solénoïdes |
LZ 1335D12
|
GO tronic
|
|||
| 2 |
Résistance |
22 Ohm 1/4W |
|
|
148-095 | Radiospares |
| 2 |
Condensateur céramique |
1KV 1000pF |
|
|
473-0367 | Radiospares |
| 2 |
Potentiomètre rotatif |
10KOhm |
3310P-001-103L |
Bourns |
691-6885 | Radiospares |
Script Arduino
/* Midi Glock - Mike Cook April 2008
 *  based on code by kuki
 * -----------------
 * listen for MIDI serial data, and fire solenoids for individual notes

#####################################################################################################################################################

HARDWARE NOTE:
The MIDI Socket is connected to arduino RX through an opto-isolator to invert the MIDI signal and seperate the circuits of individual instruments.
Connect the 8 solenoids to pin2 to pin9 on your arduino and pin 13 to the drive enabling monostable.

####################################################################################################################################################
*/

//variables setup

byte incomingByte;
byte note;
byte velocity;
int noteDown = LOW;
int state=0;  // state machine variable 0 = command waiting : 1 = note waitin : 2 = velocity waiting
int baseNote = 60;  // lowest note
int outputs[] = {   2,  3,  4,  5,  6,  7,  8,  9, 10, 11, 12, 13};
//for this notes : 60, 61, 62, 63, 64, 65, 66, 67, 68, 69, 70, 71

int channel = 1; // MIDI channel to respond to (in this case channel 2) chnage this to change the channel number
                 // MIDI channel = the value in 'channel' + 1

//setup: declaring iputs and outputs and begin serial
void setup() {
  pinMode(2,OUTPUT);        // declare the solenoid's pins as outputs
  pinMode(3,OUTPUT);
  pinMode(4,OUTPUT);
  pinMode(5,OUTPUT);
  pinMode(6,OUTPUT);
  pinMode(7,OUTPUT);
  pinMode(8,OUTPUT);
  pinMode(9,OUTPUT);
  pinMode(10,OUTPUT);
  pinMode(11,OUTPUT);
  pinMode(12,OUTPUT);
  pinMode(13,OUTPUT);

  state = 0;  // initilise state machine variable

  //start serial with MIDI baudrate 31250 or 38400 for debugging
  Serial.begin(31250);
}

//loop: wait for serial data, and interpret the message
void loop () {

  if (Serial.available() > 0) {
    // lecture du signal -> "incoming byte"
    incomingByte = Serial.read();

    switch (state){
      case 0:
         // look for as status-byte, our channel, note on
         if ((incomingByte== (144 | channel))){
           noteDown = HIGH;
           state=1;
         }

         // look for as status-byte, our channel, note off
         if (incomingByte >= 128 && incomingByte <=143){
           noteDown = LOW;
           state=1;
         }

       case 1:
         // get the note to play or stop
         if(incomingByte < 128) {
           note=incomingByte;
           state=2;
         }
         else{
           state = 0;  // reset state machine as this should be a note number
         }

         break;

       case 2:
         // get the velocity
         if(incomingByte < 128) {
           playNote(note, incomingByte, noteDown); // fire off the solenoid
         }
         state = 0;  // reset state machine to start
     }
  }
}

void playNote(byte note, byte velocity, int down){

  if (velocity != 0) // Uniquement si le signal est un NOTE ON
  {
    int newNote = note - baseNote;
    if (newNote >= 0 && newNote < 12)
    {
      digitalWrite(outputs[newNote], HIGH);
      delay(10);
      digitalWrite(outputs[newNote], LOW);
    }
  }
}
Photos
Videos
Autre projet : Openbaar Kabaal :
Liens externes
Conversion Musical Note vers Note Midi : http://www.barryrudolph.com/greg/midi.html
Convertisseur (en) : Site officiel
Arduino (en) : Site officiel
Contrôler des klaxons en PWM par Jérome Abel
Notes et références
* Main dans la Main : Cedric Doutriaux, Antoine Bellanger, Gaetan Ciepliki, Julien Bellanger, Yohann Veron
